Ubuntu Server Installation
On this page, you will find details on how to install RTLS Studio 2.0 to 2.6 on Ubuntu Server 18.04 LTS (64-bit) or Studio 3.0 to 3.2 on Ubuntu Server 20.04 LTS (64-bit)
Ubuntu 18.04 OS server edition is only supported OS for RTLS Studio 2.0 to 2.6. If you deploy RTLS Studio on Ubuntu 20.04 OS Server edition, the RTLS Studio could not work correctly for those versions. Ubuntu 20.04 OS server edition is supported by Studio 3.0. Alternatively, RTLS Studio 2.0.0 can be also deployed on Ubuntu 14.04 server edition, not recommended for new deployments.
Follow the installation steps based on your RTLS Studio version:
Ubuntu Server Installation Requirements
- RTLS Studio install bundle .zip package (downloadable from your myRTLS Site)
- x64 computer with Ubuntu 22.04 OS server edition pre-installed
- Static IP address set on RTLS Server
- WinSCP file transfer manager utility
The RTLS Studio software is tested and prepared for Ubuntu 22.04LTS or 20.04LTS.
- You can download the Ubuntu 22.04 server edition here: https://releases.ubuntu.com/jammy/
Please use the Ubuntu 22.04 server edition (non-GUI).
Studio 3.4 is also available for Ubuntu version 20.04 but Ubuntu 22.04 delivers all the benefits of the new Studio.
We do not recomend Ubuntu update
We do not recommend doing an update from Ubuntu 18.04 to Ubuntu 20.04. The Studio 3.2 installation needs to be done on the new Ubuntu 20.04 installation. After Ubuntu upgrades you may have an issue related to MySQL database in connection with RTLS Studio.
Installation
The installation steps below assume you are going to install RTLS Studio on Ubuntu 22.04.
- Login to Ubuntu
You finished Ubuntu installation on the server. You login via the command line. Set the static IP address to the server
First, you will need to set the server to a static IP address. The default IP address for RTLS Studio is 192.168.225.2.
Detect your Ethernet interface by typing the following command:ip address
The output should look as follows: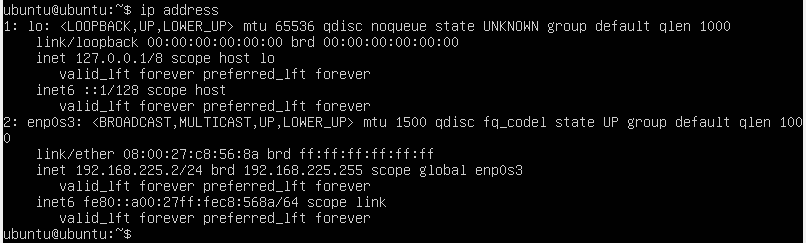
The main Ethernet interface here is enp0s3 (but it can be different in your case). Its address is 192.168.225.2.
If this is not the case use netplan to configure the network interface.
The configuration file of netplan, is under/etc/netplan/with a.yamlextension (e.g./etc/netplan/config.yaml). In our case:sudo nano /etc/netplan/50-cloud-init.yaml
If you need more details about how to change Netplan configuration see Netplan configuration examples.
Save and close the file and apply config:sudo netplan apply
- Download Install bundle of the latest RTLS Studio version
You can download the install bundle in section Deployment of your myRTLS Site. Select Studio version and type of deployment in tab RTLS Studio .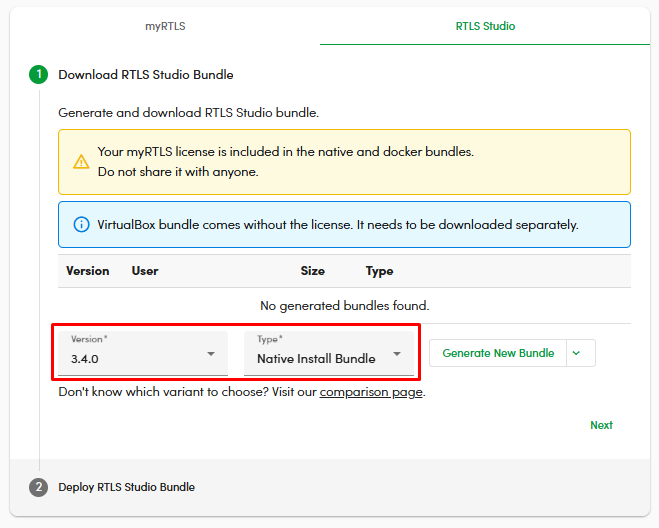
Click to generate a new bundle. It take a minute when it is done. You will receive an email notification.
When it is done Download the bundle.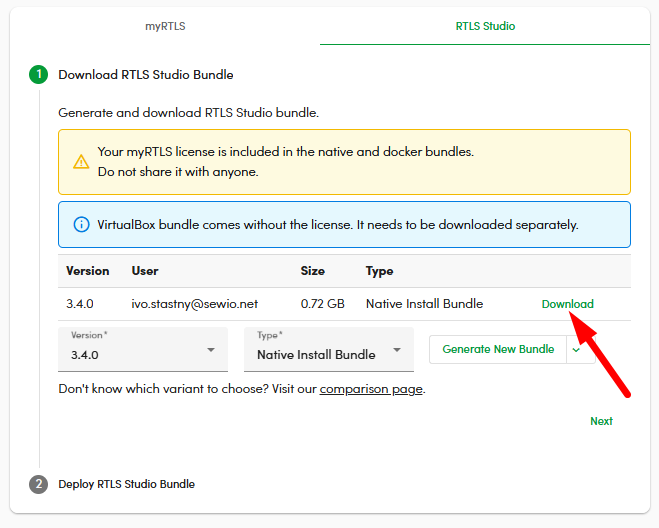
- Connect to the server with WinSCP.
Use the static IP address you set in the previous step. Copy the install bundle to the directory on the server:
In our example, it is /home/ubuntu/home/ubuntu
You should be able to see the file in the directory after.

Unzip the install bundle via command line:
Below you can find an example for Studio 3.0.0. If you have a different version be sure you select the correct file.unzip /home/ubuntu/RTLSStudio_v3.4.0_install_bundle.zip
Navigate to the install folder:
cd /home/ubuntu/install
Run the install script
sudo sh install.sh
The installation should take 10-20 minutes to finish (depending on the server and internet connection). You will be also asked for the hostname. This hostname is being used by our web services (RTLS Studio, RTLS Manager, Sensmap, Sensmap3D, etc.).
If your installation is standalone (=no access to a public network) run the install script with the command
sudo sh install.sh --standalone
Reboot the Ubuntu. After that, the installation is finished.
sudo reboot
Now the installation is complete. You can reach RTLS Studio at the IP address you set in step 2).
RTLS Studio is installed in the /home directory:
![]()
Ubuntu Server Installation Requirements
- RTLS Studio install bundle .zip package (downloadable from your myRTLS Site)
- x64 computer with Ubuntu 20.04 OS server edition pre-installed
- WinSCP file transfer manager utility
The RTLS Studio software is tested and prepared for Ubuntu 20.04LTS or 18.04.6LTS.
- You can download the Ubuntu 20.04 server edition here: https://releases.ubuntu.com/20.04/
- Please use the Ubuntu 20.04 server edition (non-GUI).
Studio 3.3 and 3.2 is also available for Ubuntu version 18.04 but Ubuntu 20.04 delivers all the benefits of the new Studio.
We do not recomend Ubuntu update
We do not recommend doing an update from Ubuntu 18.04 to Ubuntu 20.04. The Studio 3.2 installation needs to be done on the new Ubuntu 20.04 installation. After Ubuntu upgrades you may have an issue related to MySQL database in connection with RTLS Studio.
Installation
The installation steps below assume you are going to install RTLS Studio on Ubuntu 20.04.
- Login to Ubuntu
You finished Ubuntu installation on the server. You login via the command line. Set the static IP address to the server
First, you will need to set the server to a static IP address. The default IP address for RTLS Studio is 192.168.225.2.
Detect your Ethernet interface by typing the following command:ip address
The output should look as follows:
The main Ethernet interface here is enp0s3 (but it can be different in your case). Its address is 192.168.225.2.
If this is not the case use netplan to configure the network interface.
The configuration file of netplan, is under/etc/netplan/with a.yamlextension (e.g./etc/netplan/config.yaml). In our case:sudo nano /etc/netplan/00-cloud-init.yaml
If you need more details about how to change Netplan configuration see Netplan configuration examples.
Save and close the file and apply config:sudo netplan apply
- Download Install bundle of the latest RTLS Studio version
You can download the install bundle in section Deployment of your myRTLS Site. Select Studio version and type of deployment in tab RTLS Studio .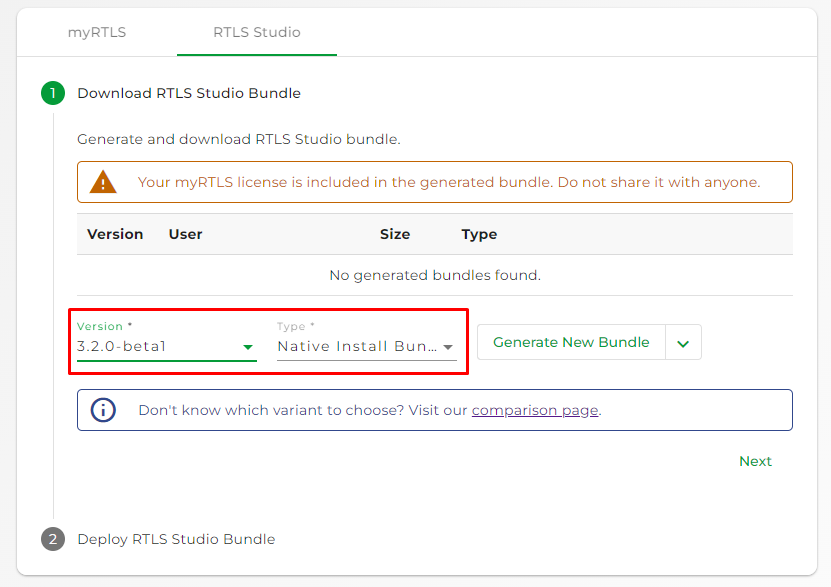 Click to generate a new bundle. It take a minute when it is done. You will receive an email notification.
When it is done Download the bundle.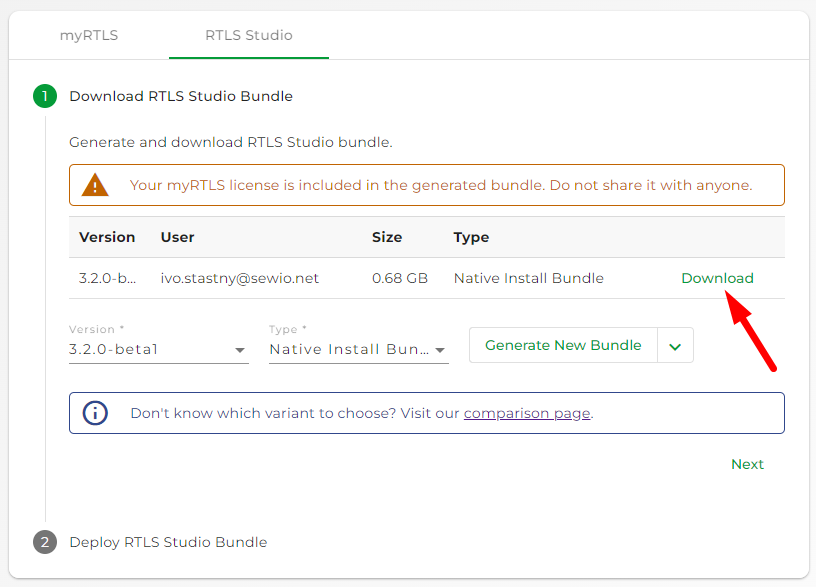
- Connect to the server with WinSCP.
Use the static IP address you set in the previous step. Copy the install bundle to the directory on the server:
In our example, it is /home/ubuntu/home/ubuntu
You should be able to see the file in the directory after.
Unzip the install bundle via command line:
Below you can find an example for Studio 3.0.0. If you have a different version be sure you select the correct file.unzip /home/ubuntu/RTLSStudio_v3.0.0_install_bundle.zip
Navigate to the install folder:
cd /home/ubuntu/install
Run the install script
sudo sh install.sh
The installation should take 10-20 minutes to finish (depending on the server and internet connection). You will be also asked for the hostname. This hostname is being used by our web services (RTLS Studio, RTLS Manager, Sensmap, Sensmap3D, etc.).
If your installation is standalone (=no access to a public network) run the install script with the command
sudo sh install.sh --standalone
Reboot the Ubuntu. After that, the installation is finished.
sudo reboot
Now the installation is complete. You can reach RTLS Studio at the IP address you set in step 2).
RTLS Studio is installed in the /home directory:
![]()
Ubuntu Server Installation Requirements
- RTLS Studio install bundle .zip package (downloadable from partner portal)
- x64 computer with Ubuntu 20.04 OS server edition pre-installed
- WinSCP file transfer manager utility
Standalone installation (without access to a public network) is not supported in Studio 3.0 by default. Contact us via Sewio Service Desk and we provide you the standalone version based on your requirements
The RTLS Studio software is tested and prepared for Ubuntu 20.04LTS or 18.04.6LTS.
- You can download the Ubuntu 20.04 server edition here: https://releases.ubuntu.com/20.04/
- Please use the Ubuntu 20.04 server edition (non-GUI).
Studio 3.0 is also available for Ubuntu version 18.04 but Ubuntu 20.04 delivers all the benefits of the new Studio.
We do not recomend Ubuntu update
We do not recommend doing an update from Ubuntu 18.04 to Ubuntu 20.04. The Studio 3.0 installation needs to be done on the new Ubuntu 20.04 installation. After Ubuntu upgrades you may have an issue related to MySQL database in connection with RTLS Studio.
Installation
The installation steps below assume you are going to install RTLS Studio on Ubuntu 20.04.
- Login to Ubuntu
You finished Ubuntu installation on the server. You login via the command line. Set the static IP address to the server
First, you will need to set the server to a static IP address. The default IP address for RTLS Studio is 192.168.225.2.
Detect your Ethernet interface by typing the following command:ip address
The output should look as follows:
The main Ethernet interface here is enp0s3 (but it can be different in your case). Its address is 192.168.225.2.
If this is not the case use netplan to configure the network interface.
The configuration file of netplan, is under/etc/netplan/with a.yamlextension (e.g./etc/netplan/config.yaml). In our case:sudo nano /etc/netplan/00-cloud-init.yaml
If you need more details about how to change Netplan configuration see Netplan configuration examples.
Save and close the file and apply config:sudo netplan apply
- Download Install bundle of the latest RTLS Studio version
You can download the install bundle of the RTLS Studio from Sewio Partner Portal section Download.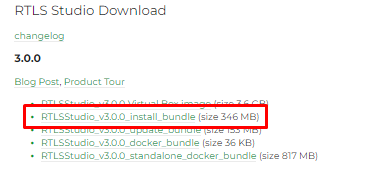
- Connect to the server with WinSCP.
Use the static IP address you set in the previous step. Copy the install bundle to the directory on the server:
In our example, it is /home/ubuntu/home/ubuntu
You should be able to see the file in the directory after.
Unzip the install bundle via command line:
Below you can find an example for Studio 3.0.0. If you have a different version be sure you select the correct file.unzip /home/ubuntu/RTLSStudio_v3.0.0_install_bundle.zip
Navigate to the install folder:
cd /home/ubuntu/install
Run the install script
sudo sh install.sh
The installation should take 10-20 minutes to finish (depending on the server and internet connection). You will be also asked for the hostname. This hostname is being used by our web services (RTLS Studio, RTLS Manager, Sensmap, Sensmap3D, etc.).
If your installation is standalone (=no access to a public network) run the install script with the command
sudo sh install.sh --standalone
Reboot the Ubuntu. After that, the installation is finished.
sudo reboot
Now the installation is complete. You can reach RTLS Studio at the IP address you set in step 2).
RTLS Studio is installed in the /home directory:
![]()
Ubuntu Server Installation Requirements
- RTLS Studio install bundle .zip package (downloadable from partner portal)
- x64 computer with Ubuntu 18.04.6 OS server edition pre-installed
- WinSCP file transfer manager utility
RTLS Studio 2.6 can be used for both online and offline deployments.
The RTLS Studio software is tested and prepared for Ubuntu 18.04LTS.
- You can download the Ubuntu 18.04.6 server edition here: https://releases.ubuntu.com/18.04/
- Please use the Ubuntu 18.04.6 server edition (non-GUI).
For offline deployment, do not perform apt update on Ubuntu due to offline RTLS Studio installation does not accept some packages that are in RTLS Studio install bundle.
Installation
- Login to Ubuntu
You finished Ubuntu installation on the server. You login via the command line. Set the static IP address to the server
First, you will need to set the server to a static IP address. The default IP address for RTLS Studio is 192.168.225.2.
Detect your Ethernet interface by typing the following command:ifconfig
The output should look as follows: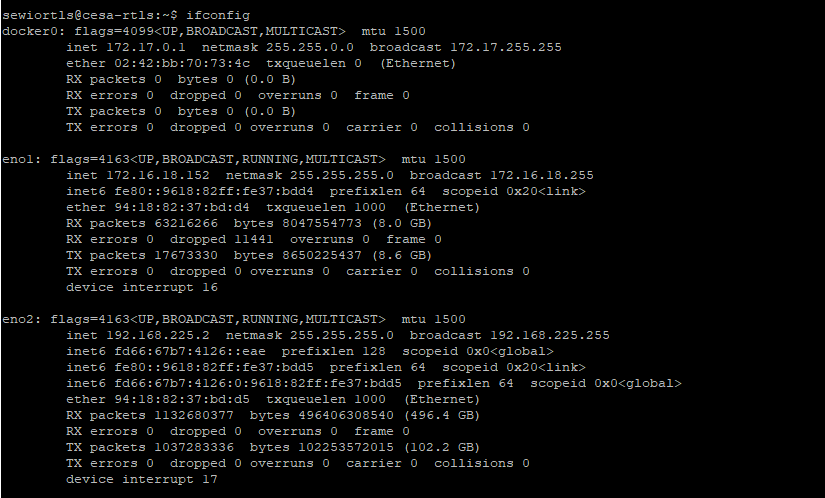
The main Ethernet interface here is eno2 (but it can be different in your case). Its address should be 192.168.225.2.
If this is not the case use netplan to configure the network interface.
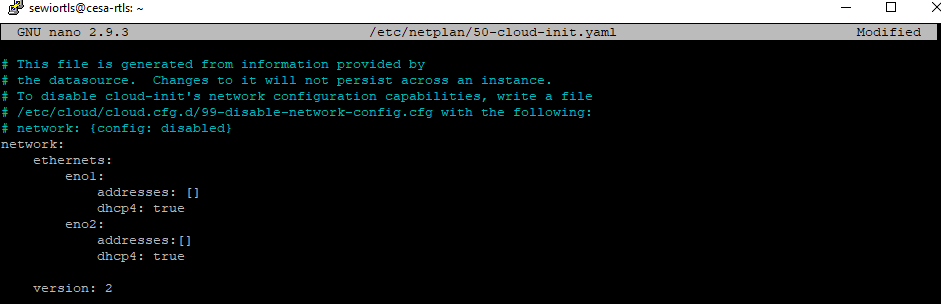
The configuration file of netplan, is under/etc/netplan/with a.yamlextension (e.g./etc/netplan/config.yaml). In our case:sudo nano /etc/netplan/50-cloud-init.yaml
If you need more details about how to change Netplan configuration see Netplan configuration examples.
Save and close the file and apply config:sudo netplan apply
- Download Install bundle of the latest RTLS Studio version
You can download the install bundle of the RTLS Studio from Sewio Partner Portal section Download.
- Connect to the server with WinSCP.
Use the static IP address you set in the previous step. Copy the install bundle to the directory on the server:
/home/sewiortls
Unzip the Install bundle via command line:
Below you can find an example for Studio 2.4.4. If you have a different version be sure you select the correct file.unzip /home/sewiortls/RTLS_Studio_2.4.4_install_bundle.zip
Navigate to the install folder:
cd /home/sewiortls/install
Run the install script
sudo sh install.sh
The installation should take 10-20 minutes to finish (depending on the server and internet connection). You will be also asked for the hostname. This hostname is being used by our web services (RTLS Studio, RTLS Manager, Sensmap, Sensmap3D, etc.).
Reboot the Ubuntu. After that, the installation is finished.
sudo reboot
- Now the installation is complete. You can reach RTLS Studio at the IP address you set in step 2).
Ubuntu Server Installation Requirements
- RTLS Studio install bundle .zip package (downloadable from partner portal)
- x64 computer with Ubuntu 18.04 OS server edition pre-installed
- WinSCP file transfer manager utility
The RTLS Studio software is tested and prepared for Ubuntu 18.04LTS.
- You can download the Ubuntu 18.04.4 server edition here: http://old-releases.ubuntu.com/releases/18.04.4/.
- Please use the Ubuntu 18.04 server edition (non-GUI).
RTLS Studio must be installed on Ubuntu version 18.04.4 only. The Ubuntu version 18.04.6 is not supported for Studio 2.5. For more information see our FAQ - RTLS Studio.
Installation
- Login to Ubuntu
You finished Ubuntu installation on the server. You login via the command line. Set the static IP address to the server
First, you will need to set the server to a static IP address. The default IP address for RTLS Studio is 192.168.225.2.
Detect your Ethernet interface by typing the following command:ifconfig
The output should look as follows:
The main Ethernet interface here is eno2 (but it can be different in your case). Its address should be 192.168.225.2.
If this is not the case use netplan to configure the network interface.
The configuration file of netplan, is under/etc/netplan/with a.yamlextension (e.g./etc/netplan/config.yaml). In our case:sudo nano /etc/netplan/50-cloud-init.yaml
If you need more details about how to change Netplan configuration see Netplan configuration examples.
Save and close the file and apply config:sudo netplan apply
- Download Install bundle of the latest RTLS Studio version
You can download the install bundle of the RTLS Studio from Sewio Partner Portal section Download. - Connect to the server with WinSCP.
Use the static IP address you set in the previous step. Copy the install bundle to the directory on the server:
/home/sewiortls
Unzip the Install bundle via command line:
Below you can find an example for Studio 2.4.4. If you have a different version be sure you select the correct file.unzip /home/sewiortls/RTLS_Studio_2.4.4_install_bundle.zip
Navigate to the install folder:
cd /home/sewiortls/install
Run the install script
sudo sh install.sh
The installation should take 10-20 minutes to finish (depending on the server and internet connection). You will be also asked for the hostname. This hostname is being used by our web services (RTLS Studio, RTLS Manager, Sensmap, Sensmap3D, etc.).
Reboot the Ubuntu. After that, the installation is finished.
sudo reboot
- Now the installation is complete. You can reach RTLS Studio at the IP address you set in step 2).
Ubuntu Server Installation Requirements
- RTLS Studio install bundle .zip package (downloadable from partner portal)
- x64 computer with Ubuntu 18.04 OS server edition pre-installed
- WinSCP file transfer manager utility
- Internet connection (for installation only).
The RTLS Studio software is tested and prepared for Ubuntu 18.04LTS.
- You can download the Ubuntu 18.04.4 server edition here: http://old-releases.ubuntu.com/releases/18.04.4/.
- Please use the Ubuntu 18.04 server edition (non-GUI).
RTLS Studio must be installed on Ubuntu version 18.04.4 only. Version 18.04.6 is not supported. For more information see our FAQ - RTLS Studio.
Installation
- Login to Ubuntu
You finished Ubuntu installation on the server. You login via the command line. Set the static IP address to the server
First, you will need to set the server to a static IP address. The default IP address for RTLS Studio is 192.168.225.2.
Detect your Ethernet interface by typing the following command:ifconfig
The output should look as follows:
The main Ethernet interface here is eno2 (but it can be different in your case). Its address should be 192.168.225.2.
If this is not the case use netplan to configure the network interface.
The configuration file of netplan, is under/etc/netplan/with a.yamlextension (e.g./etc/netplan/config.yaml). In our case:sudo nano /etc/netplan/50-cloud-init.yaml
If you need more details about how to change Netplan configuration see Netplan configuration examples.
Save and close the file and apply config:sudo netplan apply
- Download Install bundle of the latest RTLS Studio version
You can download the install bundle of the RTLS Studio from Sewio Partner Portal section Download. - Connect to the server with WinSCP.
Use the static IP address you set in the previous step. Copy the install bundle to the directory on the server:
/home/sewiortls
Internet connection
Now, you need to establish an internet connection to your server.
If you have the internet on a different network with a DHCP server, then open the network configuration file of netplan, which is under/etc/netplan/with a.yamlextension.sudo nano /etc/netplan/50-cloud-init.yaml
Change the dhcp4 parameter from false to true for the given interface:
Save and close the file and apply config:
sudo netplan apply
Unzip the Install bundle via command line:
Below you can find an example for Studio 2.4.4. If you have a different version be sure you select the correct file.unzip /home/sewiortls/RTLS_Studio_2.4.4_install_bundle.zip
Navigate to the install folder:
cd /home/sewiortls/install
Run the install script
sudo sh install.sh
The installation should take 10-20 minutes to finish (depending on the server and internet connection). You will be also asked for the hostname. This hostname is being used by our web services (RTLS Studio, RTLS Manager, Sensmap, Sensmap3D, etc.).
- Change the server's Ethernet interface back to a static IP address as described in step 2)
In step 6) you change the IP address for DHCP. It is necessary to change it back to a static IP address. Reboot the Ubuntu.
When the static IP address is back.sudo reboot
- Now the installation is complete. You can reach RTLS Studio at IP address you set in step 2).