VirtualBox Installation
RTLS Studio offers VirtualBox images for each version, providing an easy deployment method suitable for beginners, small Proof of Concept (PoC), or demonstrations. This user manual guides you through the process of deploying RTLS Studio in VirtualBox. Ensure that VirtualBox is installed on your host PC before proceeding. Additionally, RTLS Studio is available for native Ubuntu or Docker installation.
VirtualBox Installation Requirements
Before initiating the deployment process, ensure you have the following:
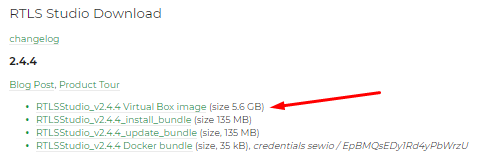
RTLS Studio VirtualBox Image .zip Package: Obtain the RTLS Studio VirtualBox image .zip package from your myRTLS Site.
Installed VM VirtualBox on Your PC: Download and install VM VirtualBox on your PC from https://www.virtualbox.org/.
Installation
- Download Oracle VirtualBox:
Visit the official website of Oracle VirtualBox
- Locate the "Download VirtualBox 7.0" button and click on it.
- Download VirtualBox Package for Windows Host:
- Choose the latest VirtualBox package designed for Windows host.
- Begin the download process.

- Install Oracle VirtualBox:
- Open the downloaded VirtualBox installation file
- Follow the on-screen instructions to complete the installation process.
- Download RTLS Studio Install Bundle:
- Once VirtualBox installation is successfully completed, proceed to download the RTLS Studio Install Bundle.
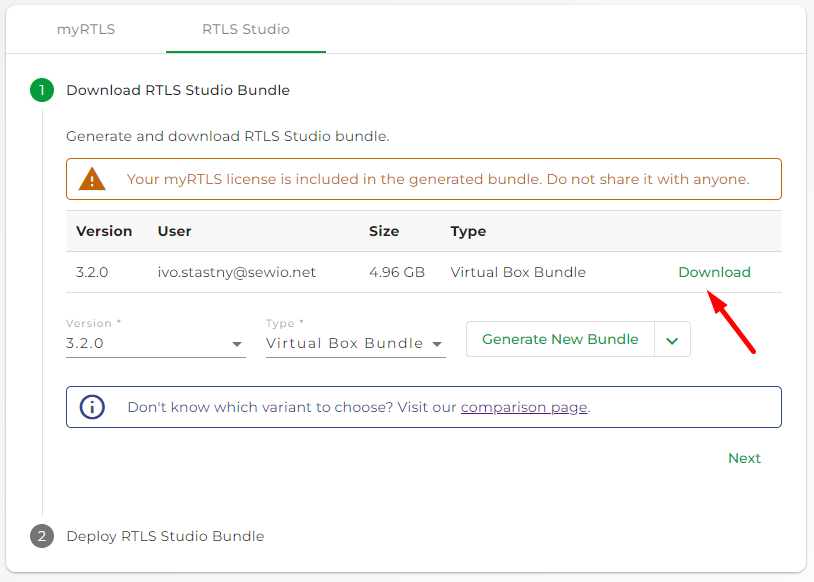
- Visit the Deployment section on your myRTLS Site.
- In the RTLS Studio tab, select the desired Studio version and type of deployment.

- Generate and Download the Install Bundle:
- Click on the option to generate a new bundle.
- Wait for the generation process to complete; this may take a minute.
- Upon completion, you will receive an email notification.
- Download the generated bundle from the provided link in the email.
- Add VirtualBox Image:
- unzip downloaded file
- Launch VirtualBox.
- Select "Machine" > "Add"
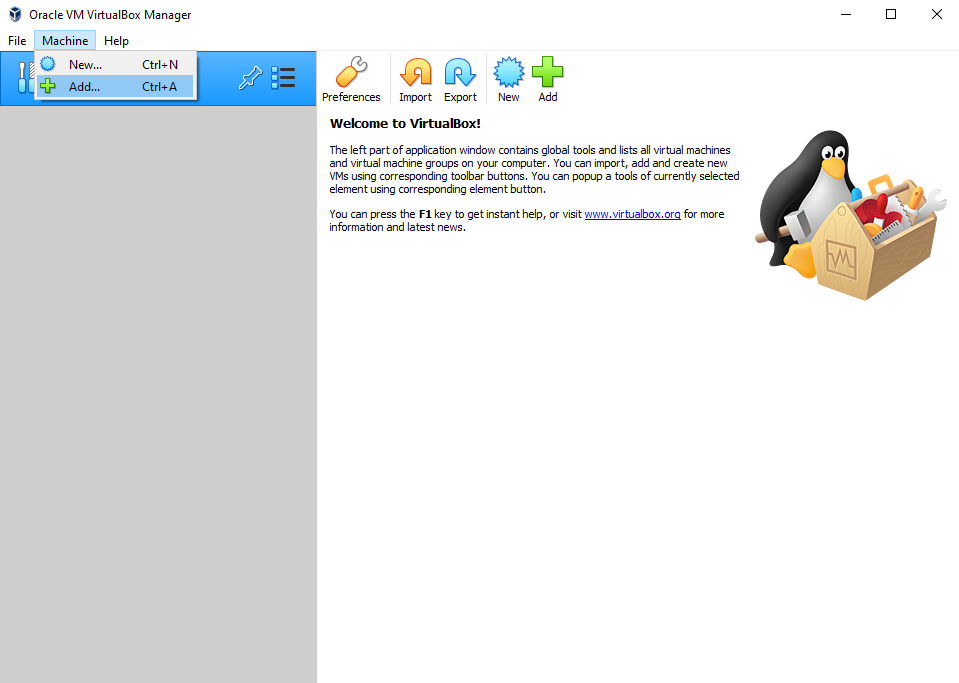
- Choose the RTLS Studio VirtualBox Image and click "Open."

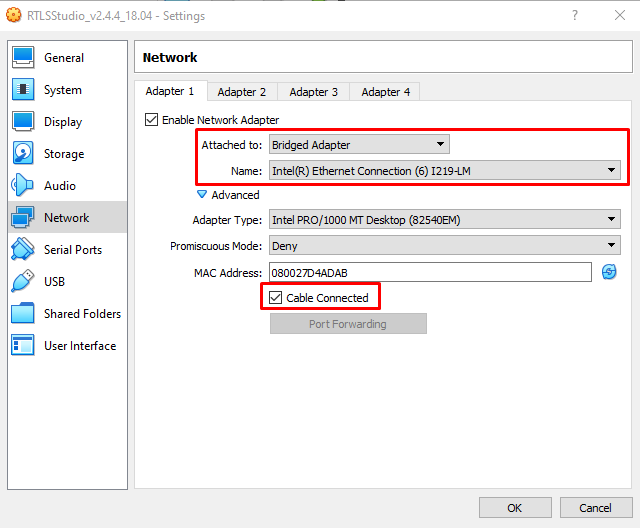
- Configure VirtualBox Image:
- Select the imported image in the VirtualBox main window.
- Click "Settings."

- Navigate to the "Network" section.
- Ensure the Ethernet network adapter is selected, and the "Cable Connected" checkbox is checked.
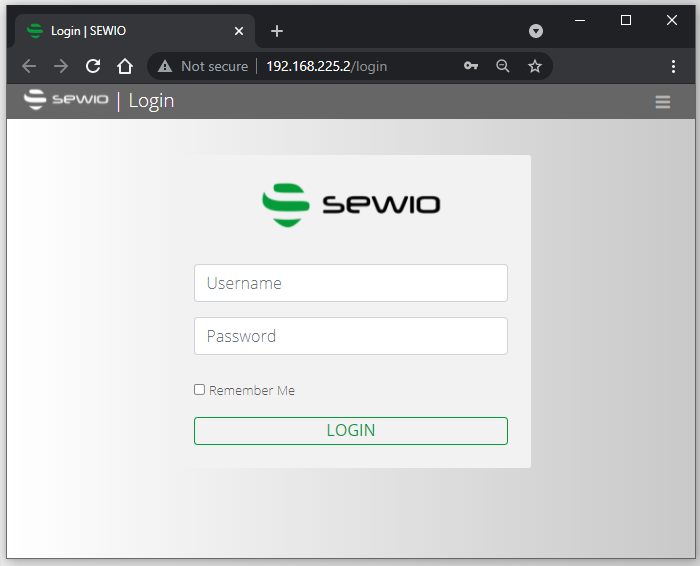
- Launch RTLS Studio:
- Return to the VirtualBox main window.
- Highlight the RTLS Studio VirtualBox Image.
- Click "Start."

Following these steps will result in the launch of RTLS Studio.
Once the Virtual Box is running, your computer will need to have an Ethernet cable plugged in. Otherwise, you will not be able to connect to RTLS Studio.
Please also ensure that Virtual Box has enough resources. Set at least 2 CPU cores. For the laptop please set it to full-performance mode instead of power-saving mode.
- Deploy and Connect Anchors:
- After successful installation and configuration, proceed to deploy and connect all Anchors as per the RTLS Studio guidelines.
- After successful installation and configuration, proceed to deploy and connect all Anchors as per the RTLS Studio guidelines.
Congratulations! You have successfully installed and configured Oracle VirtualBox and RTLS Studio. Follow the specific RTLS Studio guidelines for deploying and connecting Anchors to complete the setup.
- Download Oracle VirtualBox:
Visit the official website of Oracle VirtualBox
Locate the "Download VirtualBox 7.0" button and click on it.
- Download VirtualBox Package for Windows Host:
- Choose the latest VirtualBox package designed for Windows host.
- Begin the download process.
- Install Oracle VirtualBox:
- Open the downloaded VirtualBox installation file
- Follow the on-screen instructions to complete the installation process.
- Download RTLS Studio VirtualBox Image:
- Visit the Sewio Portal section download.
- Download the RTLS Studio VirtualBox Image.
- Add VirtualBox Image:
- unzip downloaded file
- Launch VirtualBox.
- Select "Machine" > "Add"
- Choose the RTLS Studio VirtualBox Image and click "Open."
- Configure VirtualBox Image:
- Select the imported image in the VirtualBox main window.
- Click "Settings."
- Navigate to the "Network" section.
- Ensure the Ethernet network adapter is selected, and the "Cable Connected" checkbox is checked.
- Launch RTLS Studio:
- Return to the VirtualBox main window.
- Highlight the RTLS Studio VirtualBox Image.
- Click "Start."
Following these steps will result in the launch of RTLS Studio.
Once the Virtual Box is running, your computer will need to have an Ethernet cable plugged in. Otherwise, you will not be able to connect to RTLS Studio.
Please also ensure that Virtual Box has enough resources. Set at least 2 CPU cores. For the laptop please set it to full-performance mode instead of power-saving mode.
- Deploy and Connect Anchors:
- After successful installation and configuration, proceed to deploy and connect all Anchors as per the RTLS Studio guidelines.
- After successful installation and configuration, proceed to deploy and connect all Anchors as per the RTLS Studio guidelines.
Congratulations! You have successfully installed and configured Oracle VirtualBox and RTLS Studio. Follow the specific RTLS Studio guidelines for deploying and connecting Anchors to complete the setup.
Possible Issue - Enable Virtualization in BIOS
It could happen that the virtualization can be disabled.
If that is the case, you need to enable virtualization in BIOS. To do so, go to Search and type “Advanced startup” and select the first option. Then click “Restart now”. This will restart your computer.

Next, click the “Troubleshoot” option.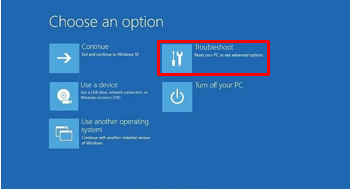
Then click the “Advanced options” button.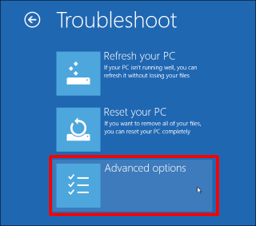
Select the “UEFI Firmware Settings” here.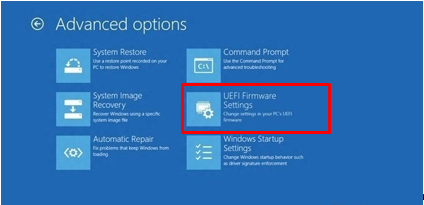
This will guide you to BIOS. Here you need to find the “Virtualization VT-x” option and select “enable”. On most computers, this can be found under “Advanced” or “Security” tabs but this option differs depending on your computer. After you have enabled virtualization, save the settings and exit BIOS. Then launch VirtualBox again and the image should load without any errors.
On this page: