Background Manipulation
The first thing that should be done when designing a plan is to set up a proper background and scale it.
It is not an easy task to change the scale of the whole design once the anchors have been placed, so please make sure the background is in the right position with the desired scales before you start placing the anchors.
Here is a guide on how to operate with backgrounds in RTLS Planner.
Background Creation
There are three types of background supported in RTLS Planner: Image (.png,.jpg), DXF, and PDF. PDFs are converted to an image, so they are basically the same. DWG is NOT supported.
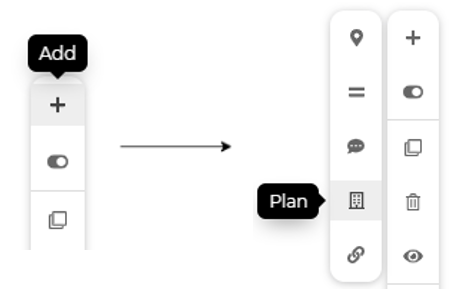
To upload the background plan, click the "![]() " button on the control panel and select plan from the list.
" button on the control panel and select plan from the list.
 In the modal window click on the
 ![]() icon.
icon.
The maximal allowed file size is 15MB. If the selected file is PDF, you are able to select what page you would like to convert and of what scale the conversion should be (bigger the scale, better the image resolution). DXF files have to be saved in ASCII format. Otherwise, they will be refused by the server.
Background Renaming
To rename the background click on its name in the image/DXF list and type a new name for your background. Once you are satisfied, hit "ENTER" or click outside of the list to confirm the changes. To revert the changes, press "ESC".
Background Scaling
It is always required to bring the image or DXF to a real scale in meters. It is done by clicking the "![]() " button in the image or DXF list. Once you click the button, you are prompted via the Editation panel to select two points on the image/DXF and their real-life distance.
" button in the image or DXF list. Once you click the button, you are prompted via the Editation panel to select two points on the image/DXF and their real-life distance.
Selecting a point on the image is done simply by clicking on the plan. You can draw the line as many times as you want until you are satisfied (it resets with a new click).
Background Rotation
Sometimes, you may need to align the plan with the x-axis a little better. There is a rotation option accessible via the "![]() " button in the image or DXF list.
" button in the image or DXF list.
Once again it prompts you to select two points on the plan. The line created by these two points will be aligned with the x-axis of the RTLS Planner. For better understanding, watch the animation below.
You may have noticed the last rotation is a 180° turn, even though the line is parallel with the x-axis. It is because it is drawn from the right to the left. The order in which the line is drawn matters for this operation.
Background Moving
Uploaded images and DXFs are automatically centered in the coordinate system. This may not be convenient for all the users so there is an option for setting the background's origin.
It is a good idea to set the origin of the coordinate system to some interesting point of the plan (corner, one of the anchors' position, the edge of the pillar), so the manipulation with the anchors is easier.
Setting background-origin is done via the "![]() " button in DXF or image list. The user is then prompted to select only one point of the plan and that point is then moved to the center of the coordinate system.
" button in DXF or image list. The user is then prompted to select only one point of the plan and that point is then moved to the center of the coordinate system.
DXF to Walls Conversion
Since DXFs contain more information than images their layers may be converted to walls. This conversion is done by pressing the "![]() " button in DXF list.
" button in DXF list.
In the modal window, you have to select the layer you would like to convert to walls. The layers in the dropdown have the same colors as the lines in the layer for easier selection.
Then you are able to set the width and the height of the newly created walls. Since you are converting lines, the default width value is 0 meters.

Background Deletion
Images and DXFs are simply deleted by pressing the "![]() " icon in their corresponding lists.
" icon in their corresponding lists.
It may be a good idea to delete a DXF after all its important layers have been converted to walls for improving performance.
On this page