Example 1 - Hello World() - Blink LED on Tag
Step 1) Create C and H Files for Your Custome App
Each application should have its own C-files and H-files
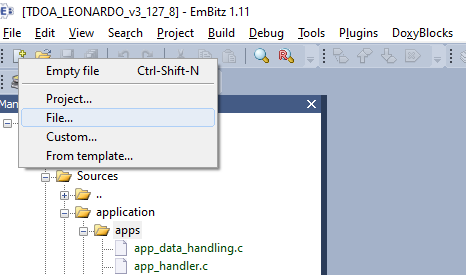
The application files should be created in “{PROJECT_ROOT_FOLDER}/application/apps” so let’s create the files there. The best way to do it is to use the form in the EmBitz, if you do it in this way the files will be automatically added to the project.
So let's name the header file “app_led_control.h”. In the form, check Add file to the active project and also check both targets (Leonardo_debug and Leonardo_release).
Once you have created the header file you can create C-file using the CTRL+h shortcut.
Now you have prepared application code files.
Step 2) Include Headers
include your header file“app_led_control.h” into “app_led_control.c”
include your header file “app_led_control.h” into “app_handler.c”
include header file “app_data_handlig.h” into “app_led_control.h”
Step 3) Define and declare app callback
Let's have the application entry callback function name app_led_control(). The entry application must be of type:
typedef uint8_t (app_t)(const app_data_t);
1) Define function in "app_led_control.c"
app_t app_led_control(app_data_t* input_data)
{
  return 0;
}
2) Declare entry function prototype in “app_led_control.h”
app_t app_led_control(app_data_t* input_data);
Step 4) Register Application
All applications must be added to the implemented_apps array that is defined in “app_handler.c”. Here must be added application id and pointer to the application entry function.
1) Add APP ID as a macro to the “app_defs.h”
The range for custom APP ID is <4096;16565>. Let’s pick the lowest one for our APP, 4096. This ID will be used during the communication between the Tag-side and the Server-side of the application. The ID will be part of all requests and responses of this APP, that will be sent from Tag to Server and vice versa.
#define APP_LED_CONTROL_ID 4096UL
2) Register APP into implemented_apps array
void app_initializer(void)
{
    // internal system app
    implemented_apps[0].app_id = APP_LED_CTRL_ID;
    implemented_apps[0].app_pointer = (app_t)app_led_ctrl;
    // your customer code!
    implemented_apps[1].app_id = APP_LED_CONTROL_ID;
    implemented_apps[1].app_pointer = (app_t)app_led_control;

    /*add other applications*/
}
3) Add User LED google to verify the application
Now it’s possible to implement simple LED toggling into the app_led_control().
The function which toggles the LED on the tag is declared in peripheral.h. So let’s include this header file into the app_led_control.c and add calling of the function LED1_TOGGLE() into the app_led_control().
app_t app_led_control(app_data_t* input_data)
{
  LED1_TOGGLE();
  return 0;
}
You can check if everything were done correctly:
Build the new FW - it should end with no errors and warnings.
Load the new FW to the tag.
Check whether LED is blinking once the firmware is running.
On this page:
